

Flat grain vs bias draping can create surprisingly different results even when the same fabric is placed on the same dress form.
Why?
Because fabric direction affects how material falls, stretches, follows curves and responds to movement.
A piece positioned on a straighter grain direction usually behaves in a more stable and controlled way. Turn that same fabric diagonally towards the bias and it can begin to fall more softly around the body.
For fashion design students, this is important because silhouette is not created only through sketching.
The fabric itself participates in the design.
A line that looks sharp on paper may become much softer once fabric is draped on the bias. A simple piece of muslin may also reveal shapes that were difficult to imagine through flat drawing alone.
Understanding grain direction therefore helps students make more informed decisions while draping instead of pinning fabric randomly and hoping the dress form has better ideas.
What Is Flat Grain vs Bias Draping?
Flat grain vs bias draping compares how fabric behaves when it is positioned along its straighter grain direction versus diagonally across the grain during garment draping.
In simple terms:
Straight or Flat Grain Direction
The fabric remains more stable and controlled.
It can be useful when the designer wants:
- cleaner lines
- controlled shaping
- defined structure
- predictable placement
Bias Direction
The fabric is positioned diagonally in relation to the straight grain.
It can create:
- softer fall
- additional give
- closer body movement
- more fluid shaping
The difference can become very visible when the fabric is placed directly on a dress form.
What Is Fabric Grain in Garment Design?
Fabric grain in garment design refers to the direction of the yarns within woven fabric.
Understanding grain helps students know how the fabric may behave when it is:
- cut
- pinned
- draped
- stitched
- worn
For woven fabric, students commonly work with:
- lengthwise grain
- crosswise grain
- bias
Each direction behaves differently.
This is why grain markings are not simply technical lines added because teachers enjoy making pattern pieces look more complicated.
They influence the way the final garment hangs.
Understanding the Lengthwise Grain
The lengthwise grain runs parallel to the selvage edge of woven fabric.
It is generally the more stable direction.
When draping along this direction, the fabric often maintains its shape more firmly.
That makes it useful when students are working on areas where they want:
- control
- vertical alignment
- cleaner structural lines
For example, a basic bodice or straight skirt exercise may rely heavily on keeping grainlines properly aligned.
If the grain shifts unintentionally, the garment may begin twisting or hanging differently from the intended design.
What Is Crosswise Grain?
Crosswise grain runs from one selvage edge towards the other.
It intersects the lengthwise grain.
Students may use horizontal grain references while draping to check whether the fabric remains balanced on the dress form.
These reference lines help identify whether the material has:
- shifted
- twisted
- stretched
- become uneven
When a horizontal guideline starts moving unexpectedly upward or downward, it can indicate that the fabric is no longer sitting as intended.
What Is Bias Grain?
Bias is the diagonal direction across woven fabric.
True bias is commonly considered the diagonal running at roughly 45 degrees to the lengthwise and crosswise grain.
This direction behaves differently because the yarn structure can move more freely when pulled diagonally.
As a result, the fabric may show more:
- flexibility
- softness
- stretch-like give
- fluid movement
This makes the bias draping technique especially interesting for designs that depend on flow and body contour.
Why Does Bias Fabric Fall Differently?
Imagine holding a square piece of woven fabric.
First, pull it vertically.
Then pull it horizontally.
Now pull two opposite corners diagonally.
The diagonal direction often feels more flexible.
That additional movement changes how the fabric responds when draped around curves.
Instead of remaining relatively rigid, it may:
- settle closer to the body
- create softer folds
- curve around the bust or hip differently
- develop more fluid lines
That is why bias draping is often associated with softer silhouettes.
Why Is Grain Direction Important During Draping?
Draping involves shaping fabric directly on a three-dimensional form.
The student can immediately observe how the material reacts.
Changing grain direction can affect:
- fit
- fall
- volume
- balance
- movement
- seam placement
This means two pieces of the same fabric can create noticeably different designs simply because they are positioned differently.
Understanding grain gives students more control over those results.
Straight Grain Creates More Controlled Shapes
When fabric is positioned along a stable grain direction, it generally provides more resistance to diagonal movement.
That can be useful for silhouettes such as:
- straight skirts
- structured bodices
- tailored shapes
- controlled panels
The fabric may still create folds or volume.
But the overall behaviour is usually more predictable.
This allows students to establish clean vertical and horizontal reference points while developing a garment.
Bias Draping Encourages Fluid Silhouettes
A bias draping technique is particularly useful when the design needs to move around the body rather than stand away from it.
Possible design directions include:
- softly draped dresses
- cowls
- fluid skirts
- asymmetric forms
- softer necklines
- body-following panels
The exact result still depends on the fabric.
Bias does not magically turn every material into a flowing evening gown.
A stiff fabric will still behave differently from a lightweight material.
The student needs to study both grain and fabric characteristics together.
Flat Grain and Bias Are Not Competing Techniques
It is easy to think:
“Which one is better?”
That is the wrong question.
Neither is automatically better.
They solve different design problems.
Straight-grain draping may be more useful when structure is important.
Bias draping may be more useful when movement and fluidity are important.
The designer chooses according to the intended silhouette.
How Fabric Direction Changes Silhouette Development
Silhouette development through draping happens when students use fabric placement to explore the overall shape of a garment.
Silhouette refers to the outer visual form of the clothing.
It may be:
- straight
- fitted
- flared
- voluminous
- draped
- asymmetric
- flowing
Grain direction influences how easily each type of silhouette can be developed.
For example:
Straight Silhouette
May benefit from stable grain placement.
Soft Fitted Silhouette
May benefit from bias movement.
Asymmetric Draped Silhouette
May involve combining different grain directions.
This is why draping is useful for creative exploration.
Students can see the silhouette developing immediately.
Example: Straight-Grain Skirt vs Bias Skirt
Imagine using the same lightweight woven fabric for two skirt experiments.
Straight-Grain Version
The fabric may fall more directly downward.
The silhouette could feel:
- cleaner
- straighter
- more controlled
Bias Version
The fabric may respond more easily around the hips and legs.
The silhouette may feel:
- softer
- more fluid
- closer to the body’s curves
Neither result is automatically more attractive.
They simply communicate different design intentions.
Example: Bodice Draping
Suppose a student wants to develop a simple fitted bodice.
Using the straight grain may make it easier to establish:
- centre front
- waist
- bust position
- side seam
The student can then control excess fabric through shaping methods such as darts or style lines.
Now imagine the same area being explored on the bias.
The fabric may begin following the body’s curves differently.
This could lead to a softer bodice rather than a sharply controlled one.
The grain direction changes the design possibilities.
Bias Draping and Cowl Necklines
Cowl necklines are a useful example of why bias matters.
A cowl depends on fabric falling into soft folds.
If the fabric is too stable or the direction does not allow enough movement, those folds may appear stiff.
Using bias can allow the material to fall more naturally.
Students can experiment by changing:
- depth of the neckline
- amount of fabric
- placement of folds
- grain direction
Small changes can create very different results.
Bias Is Useful for Asymmetric Draping
Asymmetry often benefits from experimentation.
Instead of creating identical shapes on both sides of the body, the designer may:
- twist
- gather
- fold
- wrap
fabric differently.
Bias can support this because the fabric has more freedom to move diagonally.
For example, a diagonal shoulder drape may travel across the body more naturally when the grain direction supports that movement.
Grain Direction Can Affect Balance
A garment should usually hang in the intended direction.
If fabric is unintentionally off-grain, it may:
- twist
- pull
- swing
- distort
This is different from intentionally working on bias.
With intentional bias draping, the designer knows why the fabric is positioned diagonally.
With accidental off-grain placement, the distortion may simply create fitting problems.
Understanding this difference is essential.
Intentional Bias vs Accidental Off-Grain Fabric
These two situations should not be confused.
Intentional Bias
The designer deliberately positions the fabric diagonally because the design requires more fluidity or movement.
Accidental Off-Grain
The fabric shifts away from the intended grainline during cutting or draping.
This may lead to unwanted:
- twisting
- uneven seams
- distorted balance
Professional-looking draping requires knowing whether a diagonal direction is intentional.
Random diagonal placement is not automatically creative draping.
Sometimes it is just fabric refusing to cooperate.
Why Students Mark Grainlines Before Draping
Before placing muslin on a dress form, students may mark reference lines.
These help them observe:
- centre front
- centre back
- crossgrain
- balance
- grain direction
Once the fabric is placed on the form, those lines provide visual guidance.
If the grainline suddenly curves or twists where it should remain straight, the student can identify a problem.
Without guidelines, it becomes much harder to understand what the fabric is doing.
Use Muslin to Understand the Difference
Muslin is commonly useful for learning draping because students can:
- mark it
- pin it
- cut it
- reposition it
without immediately working with the final fashion fabric.
One useful student exercise is to prepare two equal pieces of muslin.
Use one on a straighter grain direction.
Rotate the second towards the bias.
Then place both on the dress form and compare.
Notice:
- how they fall
- how they stretch
- where folds develop
- how closely they follow curves
Seeing the difference physically can make the concept much easier to understand.
A Simple Flat Grain vs Bias Draping Exercise
Students can practise with this method.
Step 1: Prepare Two Equal Fabric Pieces
Use the same material for both.
Step 2: Mark Grainlines
Identify:
- lengthwise grain
- crossgrain
- bias
Step 3: Drape the First Piece Straight
Place it carefully on the dress form.
Observe the fall.
Step 4: Drape the Second Piece on Bias
Rotate the orientation.
Observe the difference.
Step 5: Create Similar Folds
Try making the same fold or drape on both.
Step 6: Compare
Ask:
- Which feels more stable?
- Which forms softer folds?
- Which follows the body more closely?
- Which creates more volume?
This exercise helps students understand fabric behaviour through observation rather than memorisation.
Fabric Type Still Matters
Grain direction is only one part of the result.
Fabric properties also influence draping.
Consider:
- weight
- thickness
- surface
- stiffness
- weave
- existing stretch
A lightweight fabric on bias may look completely different from a heavier woven material on bias.
Students should therefore avoid assuming:
“Bias always equals soft.”
The fabric itself still matters.
Heavy and Lightweight Fabrics React Differently
Imagine two fabrics:
Lightweight Fabric
May create:
- softer folds
- more visible fluidity
- closer body movement
Heavier Fabric
May create:
- deeper folds
- stronger weight
- more controlled drape
Both can be used creatively.
But they will not produce the same silhouette even when placed on the same grain.
That is why testing fabric is so important.
How Grain Direction Affects Seams
Grain direction can influence how seams hang.
A seam that should fall vertically may begin twisting when fabric balance is incorrect.
Students should check:
- side seams
- centre lines
- style lines
while draping.
When experimenting with bias, seam placement may require extra attention because the fabric can shift more easily.
The final design should still look intentional.
Why Bias Requires Careful Handling
Bias sections may stretch while being:
- pinned
- moved
- handled
- hung
That can alter the shape.
Students should avoid pulling unnecessarily while working.
Otherwise, they may think they created a beautiful drape when they have actually stretched one side much more than the other.
Gentle handling helps preserve the intended form.
Draping Helps Students Understand Fabric Better Than Sketching Alone
Fashion illustration communicates the idea.
Draping reveals behaviour.
A sketch cannot fully show:
- how heavy the fabric feels
- where it naturally folds
- how much it stretches
- how it responds to gravity
The dress form gives immediate feedback.
That is why draping can lead to unexpected ideas.
Sometimes the fabric produces a better design direction than the original drawing.
Let the Fabric Suggest Shapes
Students sometimes force fabric to copy the sketch exactly.
But draping works best when there is some conversation between the idea and the material.
If the fabric naturally creates:
- an interesting fold
- unexpected volume
- a diagonal line
observe it.
That detail might become part of the design.
This does not mean abandoning the original concept.
It means using the material intelligently.
Combining Straight Grain and Bias in One Design
A garment does not always need to use only one direction.
A designer may combine:
- structured straight-grain bodice
- softer bias skirt
or:
- controlled main panel
- bias draped detail
This creates contrast.
One area provides stability.
Another introduces movement.
These combinations can make silhouette development more interesting.
Example: Structured Bodice With Fluid Skirt
Imagine an evening dress.
Bodice
Developed with controlled grain placement.
This creates:
- clearer structure
- defined shape
Skirt
Explored on the bias.
This may introduce:
- softer movement
- fluid fall
The contrast between both areas becomes part of the design.
Understanding grain allows the designer to create that contrast intentionally.
Common Mistakes While Learning Bias Draping
Not Marking the Grain
Students lose track of fabric direction.
Pulling the Fabric Too Much
This can distort the intended shape.
Assuming Every Fabric Will Behave the Same
Material characteristics matter.
Confusing Bias With Random Off-Grain Placement
Bias should be intentional.
Cutting Too Early
Explore the drape before removing large amounts of fabric.
Ignoring Balance Lines
Reference lines help reveal distortion.
Forcing the Fabric
Observe how the material naturally behaves.
A Practical Draping Workflow for Students
A simple project can follow these steps.
Step 1: Decide the Silhouette
Structured, fitted, flared or fluid?
Step 2: Select the Fabric
Consider its weight and behaviour.
Step 3: Identify the Grain
Mark straight grain, crossgrain and bias.
Step 4: Prepare the Dress Form
Make important reference lines visible.
Step 5: Position the Fabric
Choose the direction according to the design.
Step 6: Pin Lightly
Avoid unnecessary stretching.
Step 7: Observe the Fall
Look at folds, balance and body movement.
Step 8: Adjust
Change direction or fullness if necessary.
Step 9: Mark Important Lines
Record seams and style lines.
Step 10: Review the Silhouette
Step away from the dress form and look at the complete shape.
This helps turn draping from random experimentation into a more organised design process.
How Students Can Improve Silhouette Development Through Draping
Students can practise the same design idea several times.
For example:
Create one skirt using:
- straight grain
- slight diagonal placement
- true bias
Then compare all three.
Photograph:
- front
- side
- back
Look at:
- volume
- fit
- folds
- movement
This develops a stronger understanding of how fabric direction changes silhouette.
Why Draping Is Useful During Fashion Design Education
Draping helps connect technical understanding with creativity.
Students are not only learning where grainlines should sit.
They are also discovering what happens when those directions are changed intentionally.
This supports skills such as:
- fabric observation
- silhouette development
- garment balance
- design experimentation
- three-dimensional thinking
It also teaches patience.
Fabric has a habit of making it very clear when a design decision has not worked.
That feedback is part of learning.
How Fashion Design Education Supports Draping Practice
Understanding draping requires more than memorising the definition of bias.
Students need opportunities to handle material, test directions and observe how silhouettes develop directly on a form.
Those interested in building practical knowledge around garment development can explore the Diploma in Fashion Design & Technology.
Structured exercises can help students connect concepts such as fabric grain in garment design, draping and silhouette development.
The aim is not simply to learn where a grainline goes.
It is to understand what happens to the garment when that grainline changes.
Where to Place the YouTube Video
The supplied YouTube Short fits naturally after “How Fashion Design Education Supports Draping Practice” and before the FAQ section.
By this point, readers understand straight grain, bias, garment behaviour and silhouette development, so the video can act as a visual extension of the practical explanation.
Watch: Exploring Fabric Grain and Draping on the Dress Form
Youtube Video: https://www.youtube.com/shorts/FcQTAnZOhUY
Conclusion
Understanding flat grain vs bias draping gives fashion students more control over the way fabric becomes a garment.
Straight-grain placement can support stability, clear balance and more controlled silhouettes. Bias placement can introduce additional movement and help create softer, more fluid shapes.
Neither direction is automatically better.
The choice depends on the fabric, design and intended silhouette.
Students should mark the grain, test the fabric on a dress form and observe what changes before finalising a design.
Those interested in developing stronger practical skills in draping and garment creation can explore the Diploma in Fashion Design & Technology.
A grainline may look like a simple line on fabric.
But changing its direction can change the entire silhouette.
FAQs
What is flat grain vs bias draping?
Flat grain vs bias draping compares how woven fabric behaves when draped along a more stable straight-grain direction versus diagonally on the bias. Straight grain generally gives greater stability and control, while bias allows more diagonal give and can produce softer, more fluid shapes depending on the material being used.
What is a bias draping technique?
A bias draping technique involves positioning fabric diagonally relative to its straight grain while developing a garment on a dress form. This direction can allow woven fabric to move and conform differently around the body. Designers may use it for softer folds, fluid silhouettes, cowls or other draped details.
Why is fabric grain in garment design important?
Fabric grain in garment design influences how material hangs, moves and maintains balance. Correct grain placement can help a garment sit as intended, while accidental off-grain placement may create twisting or distortion. Designers may also deliberately use bias when they want a different kind of movement or silhouette.
Does bias fabric always stretch?
Bias-cut woven fabric can provide more diagonal give than the same fabric positioned on its straight grain. However, the amount of movement depends on the construction and characteristics of the particular fabric. Bias should therefore be tested with the actual material instead of assuming every fabric will behave identically.
How does grain affect silhouette development through draping?
Silhouette development through draping changes because grain direction influences the way fabric follows the body and forms folds. A stable grain direction may support cleaner, more structured shapes, while bias can encourage softer and more fluid forms. The final effect also depends on fabric weight, texture and design.
Is bias draping suitable only for dresses?
No. Bias techniques can be explored in skirts, tops, panels, necklines and other garment areas. Designers may also combine stable grain placement and bias sections within one garment. The suitable approach depends on the intended silhouette and the behaviour of the selected fabric.
What is the difference between bias and fabric being accidentally off-grain?
Bias placement is a deliberate design decision. The designer intentionally uses the diagonal direction to achieve a particular effect. Accidental off-grain fabric occurs when the intended grainline shifts unintentionally, which may cause problems such as twisting, uneven balance or unwanted distortion.
How can fashion students practise grain direction during draping?
Students can mark straight grain, crossgrain and bias on equal pieces of muslin and drape them separately on a dress form. Comparing how each piece falls, stretches and creates folds makes the difference easier to understand. Photographing each experiment can also help students review the resulting silhouettes.
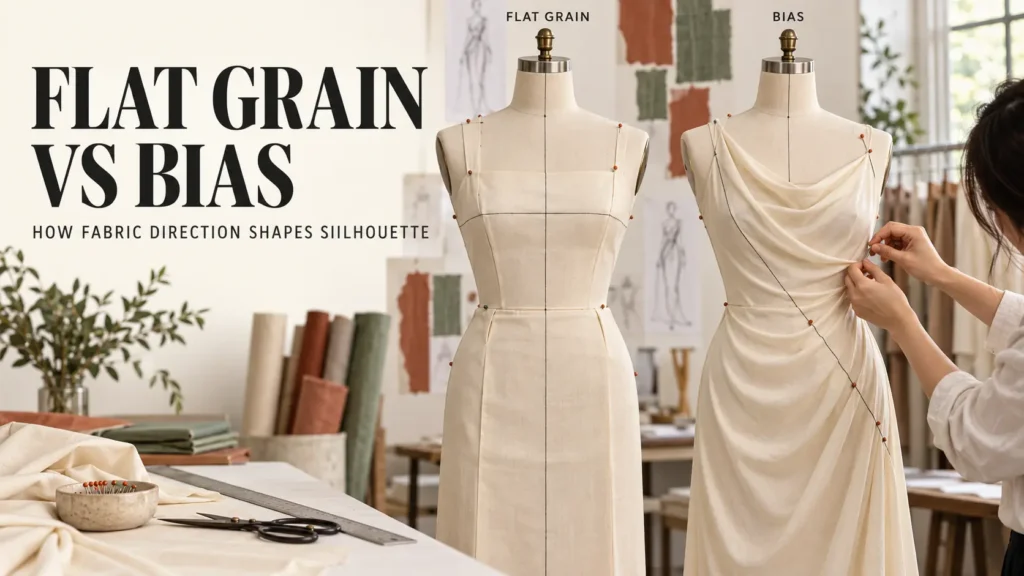
Table Of Content
- What Is Flat Grain vs Bias Draping?
- What Is Fabric Grain in Garment Design?
- Understanding the Lengthwise Grain
- What Is Crosswise Grain?
- What Is Bias Grain?
- Why Does Bias Fabric Fall Differently?
- Why Is Grain Direction Important During Draping?
- Bias Draping Encourages Fluid Silhouettes
- Flat Grain and Bias Are Not Competing Techniques
- How Fabric Direction Changes Silhouette Development
- Bias Is Useful for Asymmetric Draping
- Grain Direction Can Affect Balance
- Intentional Bias vs Accidental Off-Grain Fabric
- Why Students Mark Grainlines Before Draping
- Use Muslin to Understand the Difference
- Draping Helps Students Understand Fabric Better Than Sketching Alone
- Common Mistakes While Learning Bias Draping
- How Students Can Improve Silhouette Development Through Draping
- How Fashion Design Education Supports Draping Practice
- Where to Place the YouTube Video
